

This post contains affiliate links for your convenience. All opinions are my own. Wooo, wooo, wooo! Watch out! The fire truck is coming! We’re off to the rescue! I am so excited about our DIY Fireman Air Tank! Pretend play is a daily part of our household. A few days ago Grammy sent little C his very own Heroes Police and Fire House. I’ve wanted a boy doll house for so long and when the doorbell rang, I think I was just as excited! It was a perfect time to make him an air tank to go along with his hat, firehouse, and Rescue Heroes Action Figures for pretend play. Not to mention, I have part of his kids Halloween costume made now! Little C informed me it could be a scuba diving tank too! A while back I remember seeing a jet pack from Doodle Craft and I was totally inspired! C loves to be a fireman, especially with Daddy’s boots!
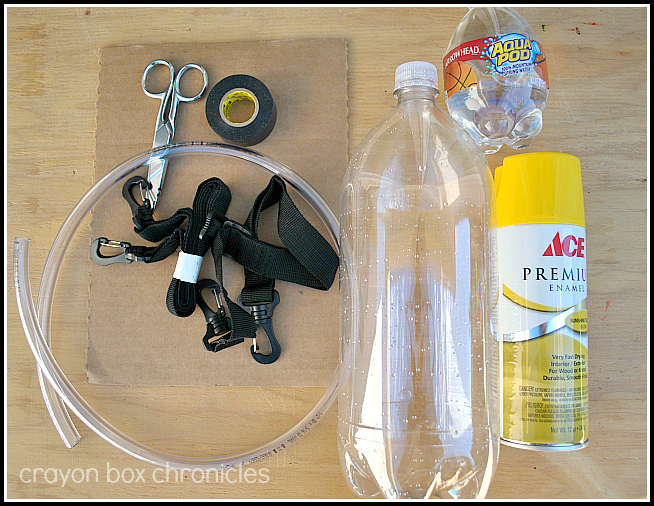
Materials Needed:
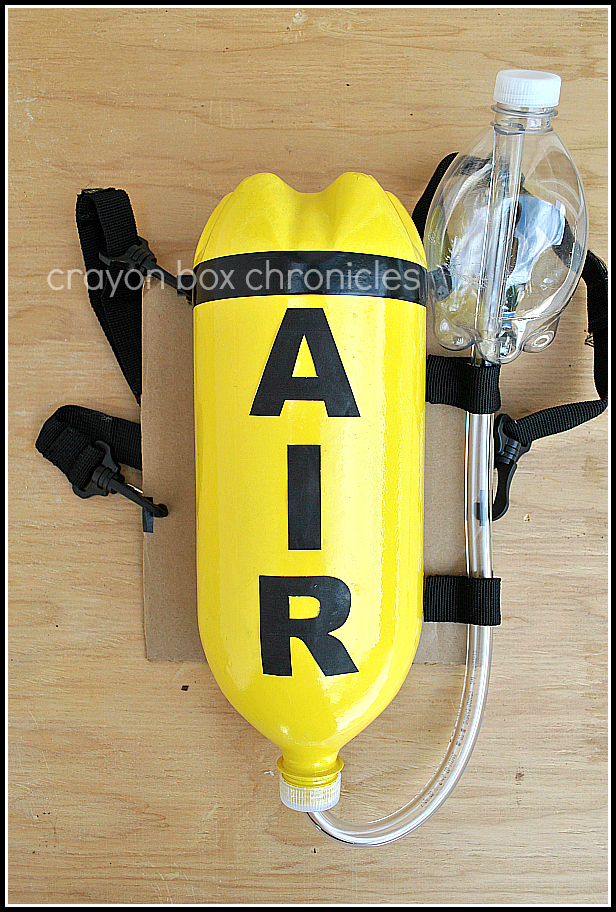
- Plastic 2-Liter Bottle
- 1/2″ Vinyl Tubing, 1-3 Feet
- Aqua Pod Water Bottle
- Yellow Spray Paint
- Hot Glue/Gun
- Electrical tape
- Black Webbing
- Cardboard
- Drill with 3/8 bit
- Scissors
- Hole Punch
- Swivel Clips {optional}
- Painters Tape {optional}
- Letters {optional}
What’s Next:
1. This is a parent project! Determine whether you want to tape the letter AIR, stencil after painted yellow, or add with paper and glue. My first attempt was taping with electrical tape; my second attempt was using painters tape; my third attempt was paper and glue after I painted it. I ended up printing AIR on a Word.doc, cutting it out, and gluing it on.
1. Make sure you flip the bottle upside down BEFORE you stencil or tape!! I made the same mistake 2x see electrical tape mistake below, bottle is the wrong way.

2. I recommend the paper and glue option. It’s a much cleaner look. Now, paint the bottle and set aside to dry. Let’s prepare the cardboard and straps.

3. Next, prepare the straps. I used old straps from a portable DVD case. You can use straps from an old purse or buy the webbing and swivel clips from Home Depot or a fabric store. My straps were too long so I shortened them by cutting off the excess and sewing them back together. No sew option? Just use hot glue or staple them together after shortening. Super easy and quick! Another option is using fabric to make scraps. For fabric strap option: cut slits in the cardboard instead of holes then loop it through and staple. Personally, I love the swivel clips because it allows for better movement and it will last longer. Also, the adjustable straps will grow with your child.
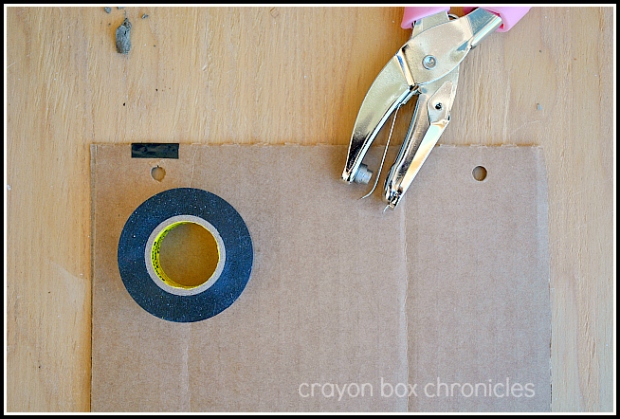
4. Punch holes 1″ from each side on the top of cardboard. Repeat on side. I recommend lining the cardboard up with your child’s shoulder blades. Reinforce the top of the holes with electrical tape for extra stability.
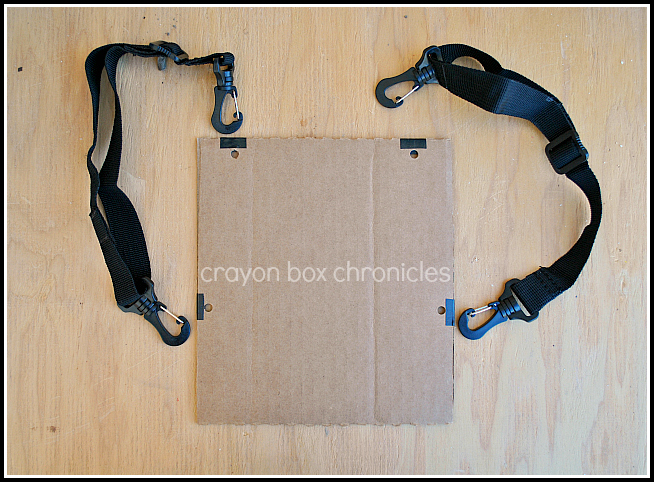
5. Finally, attacked the clips through the holes with metal clip-part facing inwards (toward child’s back).

6. Drill a hole into the bottom of the Aqua Pod bottle. I used a 3/8 bit for 1/2″ vinyl tubing. It took a bit of wiggling and patience. Next, with a tiny bit, pre-drill the white bottle cap from your large soda bottle, not from the Aqua Pod bottle. Next, drill the small cap with 3/8 bit — use EXTREME CAUTION when drilling with a large bit! They are very dangerous, especially when drilling the small cap.

7. Insert tubing into both ends. Once your yellow tank is dry, add your paper lettering or peel tape to show lettering. Add a strip of black electrical tape around the top of the bottle. Next, adhere the yellow tank to the cardboard using hot glue or a strong bonding agent. If using hot glue, apply it to the cardboard, then attach the bottle. Make sure the nozzle is facing down. I held it up to C to gauge where to put the yellow tank on the cardboard. Attach the small white cap to the end of the large yellow soda bottle to complete the hook-up.
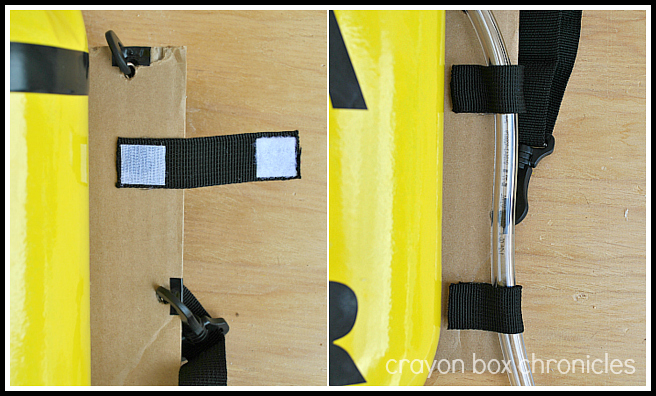
8. Let’s add the 2 small latches with the excess webbing to secure the tubbing. Determine the length you’d like the tubing and push any excess into the yellow bottle. As pictured above, I chose to use velcro to make it adjustable, but for the purposes of this tutorial, I recommend shortening the tube, gluing everything down including the tube, and sealing all caps and fasteners permanently. **Always supervise your children during play and only allow them to play with age appropriate toys. This toy is NOT appropriate for all ages.

Wooo, wooo! Off to the rescue! Now it’s the kids turn to play and enjoy their new fireman air tank! Have fun! Here’s C playing or should I say Mr. C Fireman!


C loves his new firehouse! He’s definitely partial to the cool helicopter and figures! Thank you Grammy! He kept running around saying, “Whoooo, wooo!”


Here’s my favorite picture of him shaking his rump! Super fun, right?! Making a fireman air tank out of recycled materials is inexpensive and a fun addition to a child’s dress-up collection!


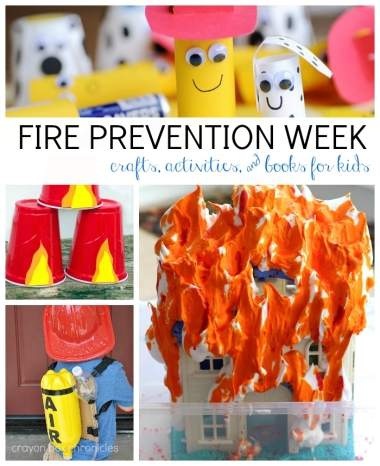
What are you planning for fire prevention week? Here are some easy, fun fire prevention week activities for the kids.
Are you following our Kids Crafts & Activities on Pinterest?
CONNECT WITH US > Pinterest :: Facebook :: Twitter :: Bloglovin’ :: Goggle+
Affiliate Links:


woohoo… It is a great project. My kid also wanted to have one costume of firefighters after watching a movie. Now, this is a great DIY project for me which I can do with my little son.
LikeLike
my son is anxious to perform with uniforms and fire extinguishers at an annual school event, which you give me will help me next year thanks
LikeLike
this is a very impressive idea your child’s ideals can be realized correctly
LikeLike