

Autumn — colorful foliage, spicy aromas, warm apple cider, and sensory heaven! On this cold winter afternoon (not here, but still), let’s adventure back in time to a beautiful fall day and create a tree — cork and spatula style! Dig into your utensil drawer and pull out a spatula, slotted spoon, old corks, and let’s paint!
Fun Fact:
Why do leaves change colors? As the days become shorter and the nights get longer, the temperature slowly drops. Autumn comes, then winter. Trees respond to the decreasing amount of sunlight by producing less and less chlorophyll. Eventually, a tree stops producing chlorophyll. When that happens, the carotenoid already in the leaves can finally show through. The leaves become a bright rainbow of glowing yellows, sparkling oranges and warm browns. Fact Source

- wine corks, cleaned and dried
- brown paper bag
- tempura paint, non-toxic
- plastic containers or paper plates for paint
- masking tape
- butcher paper
- scissors
- glue


Cover your work surface. Tape the corners of your paper down to prevent shifting. For a flat tree base — trace and cut a tree trunk out of brown butcher paper, construction paper, or the inside of a bag paper bag. Depending on your child’s ability, encourage them to draw their version of a tree trunk. I’ve included templates to print and trace as a guide on the bottom of the page. Let work on making an elevated base.

1. For an elevated base — cut down the seam of a brown paper bag. Cut the bottom of the bag off too.
2. Twist it in a circular, tube-like motion to create the stump. Once you twist it, you’ll need to manipulate it to get a chunkier base.
3. Next, apply glue. Add a heavy book on top and allow to dry, roughly 15 minutes. Now, let’s create the branches while the base is drying.

4. Cut a smaller piece of the bag.
5. Roll and twist. Repeat. Repeat. Repeat.
6. Twist your branch and squeeze the middle pint to create the V.
7. Rip or cut the ends to create branch tips and twist.

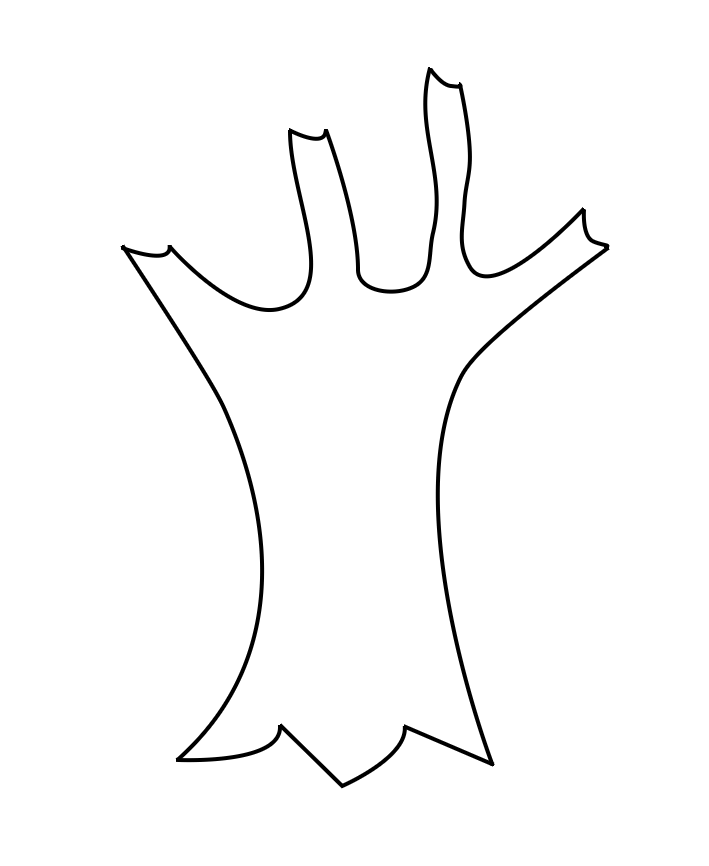
8. Once you have all your branches cut out, glue them on. Use a heavy book to help the securing/drying process. Tip: Squeeze the main glue points flat, it makes it a lot easier to glue. You’re ready to start painting! Dip and push, dip and push to create the beautiful colored leaves.

C started to use the cork, but decided to use his finger instead!

9. Encourage your child do use different colors. Discuss why the leaves change colors, seasons, and weather. C lost interest after three leaves, but he came in the end to do the grass and sky.
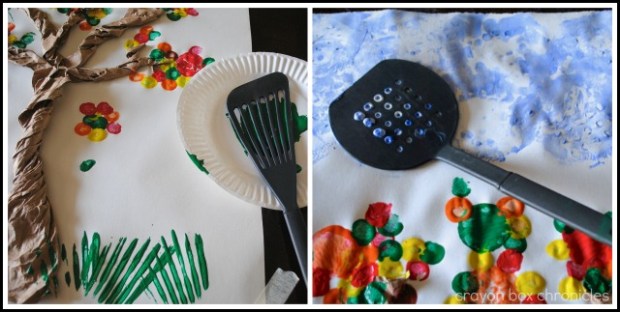
10. To create the grass, use a slotted spatula, dip, and cross the lines. To create the sky, dip flat spatula w/ hole in blue paint and rock it back and forth on the paper. At the end, tap it sideways to create splatter and paint drips. Once its dry, display your child’s masterpiece for everyone to enjoy!


Templates for trace and cut method:

If you’d like to see more, please consider Subscribing By Email.
Join us on Facebook, Pinterest, Twitter, and Bloglovin’ as we explore play through imagination!


this is awesome heather. We may have to try this before fall is over. Your turned out great:)
LikeLike
Hi Jamie! Thanks so much! 🙂
LikeLike
Going to try this out in my art class tomorrow. Thanks for the great tutorial. Proof read #3, the same sentences are repeated and the glue instructions need correcting. 😉
LikeLike
thank you SO much! I appreciate it. 🙂
LikeLike
Just realized I already said that on another comment. Sorry, not awake this morning! 😉
LikeLike
love the twisty tree! My son made a tree, just with his fingers and enjoyed making fingerprint leaves! Thank you for linking up on the Learn Through Play hop! You’ve been pinned! Come back for more fun activities throughout the month and don’t forget to share the fun!
LikeLike
thanks Leah. That’s sounds fun too! Thanks for visiting and I’ll be sure to share the fun!
LikeLike
Such an adorable craft!! My kids would definitely like this painting activity! 🙂
LikeLike
Thanks again Kristan. Thanks for giving us a great place to link up and pin others!
LikeLike