Snowman Craft for Fine Motor Play

I am so excited to have Colleen from Sugar Aunts guest posting on Crayon Box Chronicles today.  She’s sharing a fun and creative way to boost fine motor skills, along with sorting and color matching.  Her site is full of fantastic sensory and fine motor activities for children.  After reading her fun post, be sure to pop over and follow along with her wonderful blog!

Snowman Craft for Fine Motor Play

Stick Snowman Fine Motor Activity Continue reading

Heart Tissue Paper by Number Craft

Heart Tissue Paper by Number Craft by Crayon Box Chronicles

Today’s learning activity for preschoolers is easy to set-up, fun, and educational.  Our heart tissue paper by number activity helps reinforce a child’s understanding of basic numbers, color matching, as well as improve fine motor skills.  All it takes to get started is a few basic materials you probably have lying around craft table + love! C really enjoyed our turkey tissue paper by number craft, so we thought we’d try it for Valentine’s Day too! Continue reading

Heart Sensory Collage

Heart Sensory Collage by Crayon Box Chronicles

Today’s heart sensory collage explores tactile sensations, cutting, and fine motor skills. With Valentine’s Day right around the corner, this seemed like a great opportunity to create with red materials. This child-led activity give C a chance to explore materials he collected with minimal instruction from me. Continue reading

DIY Geoboard with Fabric Loops

DIY Geoboard with Fabric Loops by Crayon Box Chronicles

Trapezoids, squares, and right triangles, oh my! We love finding interesting ways to learn shapes and colors.  Our DIY geoboard is durable, educational, and sets-up in a snap.  This project has been a long-time coming for me, probably two years.  I wanted to wait until C was three and had a basic understanding of shapes.  He’s fanatical about shapes and colors, so I knew he’d gravitate to it! Boy, ow-boy was I right – he loves it! As a child, my favorite toy was a geoboard, so I think I’m just as excited. Do you ever find yourself playing with your kids toys? Continue reading

Mosaic Yarn Vase

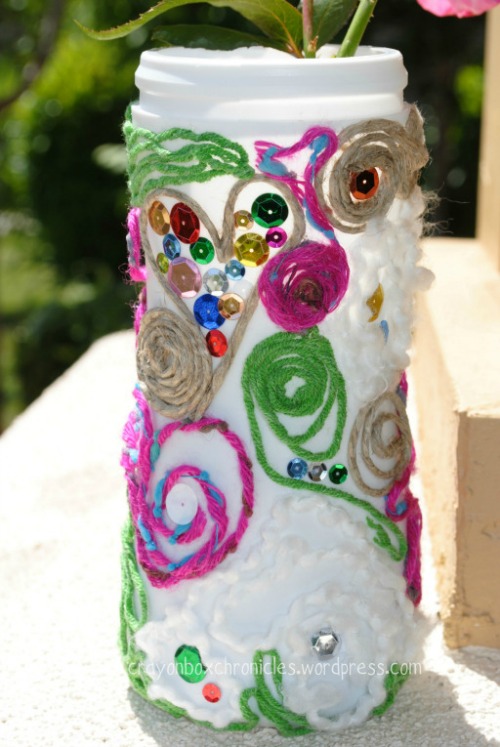
Yarn Mosaic Vase by Crayon Box Chronicles

This is our fun twist on mosaic art ― yarn style! You can up-cylce just about any container, add some colorful yarn and gems, and you’ll have a beautiful kid-made vase! This fun craft will challenge those skills needed for pre-school ― fine motor, cutting, and gluing.

Materials Needed:

  • Plastic container (we up-cycled a Happy Tot’s O’s container)
  • Yarn in many colors and varieties
  • Scissors
  • White, non-toxic glue
  • Sequins or gems (optional)

What’s Next:

First we began by cutting the yarn into different lengths, using varying colors and textures. C loved this part! Next, create lines and patterns on the container with the glue and cover the glue lines with the yarn.  If the glue dries, add more as you go.  We used a lot of glue! Tip: It helps to wash your hands periodically to remove the glue. Also, using the point of something helps stop the yarn from sticking to your fingers.

Mosaic Yarn Vase by Crayon Box Chronicles

Continue creating swirls, hearts, lines, and more fun designs! Lots of fine motor practice for kids!

Mosaic Yarn Vase by Crayon Box Chronicles

For fun bling we added sequins and gems to help in shine! Set aside to dry.  C threw his arms up and said, “I’m done!” He lasted about 10 minutes, then we took a break and came back to it.  If I did it again, I’d choose a smaller canvas for my three year old.

Mosaic Yarn Vase by Crayon Box Chronicles

A good alternative to the yarn is sequins and gems — just glue and stick for a mosaic “tile” vase! You can use cardboard or a shoe box to make a picture or use the decorated container to collect and store things — lots of options!

Yarn Mosaic Vase by Crayon Box Chronicles

If you’d like to see more, please consider Subscribing By Email.

Join us on FacebookPinterestTwitter, and Bloglovin’ as we explore play through imagination!

Dinosaur “Scaly” Paper Plate

Dinosaur Paper Plate by Crayon Box Chronicles

Rawr! Meet our scaly Brachiosaurus dinosaur! He’s super fun to make and a great sensory experience.

MaterialsNeeded
  • 2 paper plates
  • tempura paint (colors of choosing)
  • kid scissors
  • white glue
  • black marker
  • green lentils
Next
1.  Let’s start by cutting the plate.  First, cut one plate in-half to make the body of the dinosaur.
2.  Next, cut the rim or outside of the plate of the half you’re not using, it will be the neck of the dinosaur.  Use the plate scraps to cut an oval shape, it will be the head.  Set aside.
3.  Next, cut the rim or outside of the second paper plate.  Use the rim as the legs and tail of the dinosaur, cut into pieces.  I cut small triangles out of the feet for the claws!
4.  Now you’re ready to glue. Glue all pieces together, set aside to dry.
5.  Next, it’s time to paint.

Dinosaur Scaly Paper Plate by Crayon Box Chronicles

 6.  While it’s wet, add white glue, a lot of glue!

Dinosaur Scaly Paper Plate by Crayon Box Chronicles

7.  Add lentils and allow to dry.  Tip: We used a lot of lentils, so to prevent them from falling off, I added a heavy layer of glue over the lentils with a sponge brush once the lentils dried.
8.  Finally, using a black marker add an eye and mouth. Watch your child’s imagination soar –  RAWR!!

Dinosaur Scaly Paper Plate by Crayon Box Chronicles

If you like this post, please consider Subscribing By Email.

Follow us on FacebookPinterestTwitterBloglovin’ and Goggle+ as we explore play through imagination!